Log Home Inspections

Inspecting Log Homes in the Pacific Northwest
Buying a Log Home and want to make sure its a good one? We inspect both Handcrafted and Manufactured log homes and am familiar with the various methods that have been developed over the years for cutting, processing and assembling logs. We check logs for fungal activity, inspect for proper component installation and general structural integrity. There is no reason that today’s log homes cannot have a long life span however today’s builders are making concessions to design and using softer woods. Many log home owners find that in as little as 10 years there are having to replace rotted logs.
Pacific Crest Inspection’s has inspected hundreds of log home in the Snohomish, Skagit, Island and and Whatcom counties. Call us at 360-588-6956 for more information. Our log home inspections includes inspection of all the home systems and components included in our comprehensive home inspection plus the Log Home Inspection identifies the safety, material and construction defects of the visible, accessible wall, floor and roof logs.
Inspecting Log Homes is much different from traditional construction:
Log Integrity
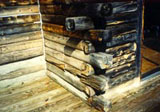
The Pacific Northwest is not kind to log homes. The long wet seasons and high moisture levels are conducive to wood rot. Any place where the logs are continually expose to rain will rot. Log end that stick out beyond the roofline or where the rain will splash on the logs are area that will rot. Log that part of a wall system are very expensive to repair. This is why we will visually examine and “sound” the logs.
Corners
First of all, most structural integrity of a log building comes from the corners. The most frequent issue we see is when the ends of the logs or the corners are exposed to water and the run off from rain. A thorough inspection of the corners to determine the level of degradation will offer a lot of insight as to how home is holding up. Here is a good description of the different types of corners.
Mold and Mildew
 Minor rotting and the presence of mold or mildew can be dealt with very effectively, and can be commonly found in NW log homes. Sources of the moisture should be identify and redirected away from the home. In some cases, cleaning the home prior to inspection, will aid in the process
The roof
 The next place to look at is the roof structure, collar ties inside the home and the upper two thirds of the walls. This is especially in the case of two story homes, or homes with a loft. Look at the plumb line of the upper sections, compared with the lower wall sections. Often, especially during the early 1900s, collar ties were cut short. With the constant weight of the roof pushing down, they lacked the strength to keep the upper three or four courses of logs from being pushed out.
You also need to check the roof for “swags” or other indications of improper settling. As older homes settled, quite often the roof was held up by the interior supporting beams that run from the floor to the roof. In essence, the walls and most of the roof settled around the supports.
In severe cases, it may become necessary to replace the entire roof structure. And while you have the roof off, you might as well pull the walls back in line before you start to replace the roof.
Doors and windows
 Another place to check for improper settling is the doors and windows. If the windows show signs of being out of level, or do not open and close freely, then you may have to rework the jambs and replace the doors and windows. The home has probably settled on the windows or doors, and over a period of time has made them difficult to use.
While you’re inside the home, pay special attention to any telltale stains that indicate water infiltration at some point in time. Some of the places that will be the most evident are support beams that pass through the log wall to the outside. If not properly sealed, water can enter the wall easily and possibly lead to rot, decay and insect infestation.
Inside corners and fireplaces
Any suspected areas can be probed with an ice pick to determine the damage. Also, check around fireplaces and mantels. Remember, logs can move, masonry cannot. So the propensity for more leaks is present in these areas, once the settling process has finished. Check the inside corners for drafts or light that may allow for heat or cool to escape. It is very difficult to get a “perfect” corner cut, especially back when no one had the proper tools. Consequently, it’s common in older homes to have corners that don’t fit exactly .
As the tendency always goes, the desire to make the inside look good often outweighs the real need to start on the exterior. In reality, you really should think about what you need to do to stop the weather from doing whatever it has been doing for the past few years. So, fight that urge to start ripping the inside apart, and concentrate on the exterior first, especially if the weather permits.
Settling
Settling in log homes is the term used to describe the loss of log wall height over time. During the first two years when the majority of wall log settling takes place an 8 foot tall wall may lose up to 6 inches in height before it has finished settling. Settling occurs when log diameter shrinks as the logs dry to a stable condition. The diameter stabilizes when the logs reach Equilibrium Moisture Content (EMC). EMC is reached when the log moisture content is equal to the average relative humidity of the home site.
Wood compression
Over time, the weight of the structure will compress wood fibers, causing the wall logs to settle. Compression causes less settling than shrinkage.
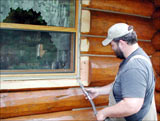
Cleaning the exterior
 If the home has gone several years without any care, probably the best thing to do first is a good exterior cleaning to remove all the graying, mold, and mildew to see what the wood underneath looks like. In some cases pressure washing is an essential step in the inspection process.
Quite often, once all that old buildup is removed, the wood comes out looking very good. But, before you start the cleaning process, take note of any suspected areas of rot, or excessive moisture retention before you just blast away at the home.
To effectively clean the old stuff off, secure a pressure washer, household bleach, TSP, or some of the new percarbonate cleaners offered in the market. You may also want to think about picking up some Oxalic Acid to “brighten” the wood up and neutralize the surface, especially if you decide to use bleach or stripper.
Pressure washers
The pressure washer you get should be around 1500 pounds per square inch (psi). Wood is a soft surface and too much pressure will damage and fray the wood. You just need enough pressure and water volume to effectively remove the stuff you want. Higher pressures will most certainly damage the wood and will blow water inside.
Using bleach
When you are ready to use the bleach mixture, put it in a low pressure (garden type) sprayer and start applying the mixture at the bottom of the structure first. Bleach applied to the top will run down the wall and cause streaks that can only be removed by sanding. Use bleach solution no stronger than 3 parts water to 1 part bleach. Leave the bleach on for 10-30 minutes and then rinse thoroughly to remove the residue. Some areas may require additional bleaching or cleaning to entirely remove discolorations. When rinsing with a pressure washer take care not to excessively damage the wood.
Always be careful when using bleach or bleaching agents, as they are normally caustic and can cause severe burns to the skin and eyes. Wear the appropriate safety gear, glasses, gloves and long sleeves, and anything else that will keep the bleach off your skin.
Pressure washing normally will “fuzz” the wood somewhat, and if you stay in one place too long, you will most certainly damage the wood. If this happens, a light sanding once the wood is dry can remove the fuzz. The pressure washer will also find all of the leaky spots in the corners and other places, so it’s a good idea to have someone inside to monitor the amount of water coming in.


Before and After
Corn grit blasters
If the idea of using caustic compounds and high pressure water bothers you, consider the use of a system to “dry clean” your home that involves no water, no caustic products and once clean, is ready for the application of a finish. There is also no harmful residue to deal with since the blast media is biodegradable and will rot and go into the soil. The home will be dry and whatever media gets inside can be easily cleaned up with a vacuum cleaner.
The downside is that most homeowners do not have a Blaster sitting at their local rental mart, and they have to obtain it from another source. These blasters also require a healthy amount of air to effectively move the blast media. In addition to the blaster you will need an air compressor capable of putting out between 125 and 185 cubic feet per minute (CFM) at 90 pounds per square inch(psi). By comparison, the normal shop type air compressor only produces about 8-10 CFM at 90 psi.
To blast with corn, you don’t need excessive pressure; you do need a high volume of air. If you think you’re ready to do this, again, be prepared for the job. Proper safety equipment, right tools, and some extra help will make the job easier and more efficient.
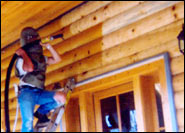 When preparing to blast your logs, be sure to follow all of the directions that came with the equipment, especially the safety end of the operation. Make sure the equipment is hooked up correctly, and you understand all of the safety requirements. Start the cleaning process at the back of the house, or on some other unnoticeable wood surface to see how the corn grits clean and what type of surface will be left before you just blast away on the front wall of the home. Start by holding the blast nozzle 2-3 ft. away at a 45 degree angle.
Once you get started, move in or out as need be to get the best cleaning action. Not all logs will clean the same, especially with old, weathered logs.
If you pass over an area that seems to leave some of the spots, move on. Dwelling or staying in one area too long will cause unnecessary damage to the wood.
The blasted surface will have varying degrees of texture, based on log density, operator capability, and other factors. The corn media will remove the soft wood easier than it does the hard wood, so normally the wood will have a “weathered” look. This look also cause the subsequent stain to develop a deeper color due to the texture of the surface and the inability to reflect light as a smooth surface does.
Make sure to test a small area or sample wood with the finish you are planning to use prior to staining the entire structure.
Rotted Logs
Minor rot can be dealt with in a number of ways. Most log home owners will use liquid epoxy to fill in and harden the affected areas. If the rot is extensive then replacement is called for. Replacing a log is not a casual task and we recommend that an expert be called to evaluate the damage and make recommendations. Unfortunately once the home is constructed, it cannot simply be dismantled like the Lincoln logs we had as kids.
Periodic inspection of the log home is essential to maintaining its health. Catching a problem while it is small will save you lots of time and money.
Log Cabin Restoration
Links to books on log home care
Brian’s Log Cabin – great site on one builders experience
Washington Log Home Builders
Mountain Log Homes, Kalama, Washington ♦ Paradise Mountain Log Homes ♦ Timberline Log Homes
Log Home Basics
 Log homes may be site-built or pre-cut in a factory for delivery to the site. Some log home manufacturers can also customize their designs. Before designing or purchasing a manufactured log home, you need to consider the following for energy efficiency:
The R-Value of Wood
In a log home, the wood helps provide some insulation. Wood’s thermal resistance or resistance to heat flow is measured by its R-value. The higher the R-value, the more thermal resistance.
The R-value for wood ranges between 1.41 per inch (2.54 cm) for most softwoods and 0.71 for most hardwoods. Ignoring the benefits of the thermal mass, a 6-inch (15.24 cm) thick log wall would have a clear-wall (a wall without windows or doors) R-value of just over 8.
Compared to a conventional wood stud wall [31 D2 inches (8.89 cm) insulation, sheathing, wallboard, a total of about R-14] the log wall is apparently a far inferior insulation system. Based only on this, log walls do not satisfy most building code energy standards. However, to what extent a log building interacts with its surroundings depends greatly on the climate. Because of the log’s heat storage capability, its large mass may cause the walls to behave considerably better in some climates than in others. Logs act like “thermal batteries” and can, under the right circumstances, store heat during the day and gradually release it at night. This generally increases the apparent R-value of a log by 0.1 per inch of thickness in mild, sunny climates that have a substantial temperature swing from day to night. Such climates generally exist in the Earth’s temperate zones between the 15th and 40th parallels.
Minimizing Air Leakage in Log Homes
Log homes are susceptible to developing air leaks. Air-dried logs are still about 15–20% water when the house is assembled or constructed. As the logs dry over the next few years, the logs shrink. The contraction and expansion of the logs open gaps between the logs, creating air leaks, which cause drafts and high heating requirements. To minimize air leakage, logs should be seasoned (dried in a protected space) for at least six months before construction begins. These are the best woods to use to avoid this problem, in order of effectiveness:
- Cedar
- Spruce
- Pine
- Fir
- Larch
Since most manufacturers and experienced builders know of these shrinkage and resulting air leakage problems, many will kiln dry the logs prior to finish shaping and installation. Some also recommend using plastic gaskets and caulking compounds to seal gaps. These seals require regular inspection and resealing when necessary.
Controlling Moisture in Log Homes
Since trees absorb large amounts of water as they grow, the tree cells are also able to absorb water very readily after the wood has dried. For this reason, a log home is very hydroscopic—it can absorb water quickly. This promotes wood rot and insect infestation. It is strongly recommended that you protect the logs from any contact with any water or moisture. One moisture control method is to use only waterproofed and insecticide-treated logs. Reapply these treatments every few years for the life of the house. Generous roof overhangs, properly sized gutters and downspouts, and drainage plains around the house are also critical for moisture control.
Shrinkage in Wood and logs
Wood shrinks as it loses moisture. This simple fact is the cause for a wide range of potential problems for wood users, including warping and splitting in lumber, squeaking wood floors, and checking and “settling” in house logs. On the other hand, an understanding of wood moisture relations is the key to preventing nearly all problems related to shrinkage. This article explains the relationship between moisture changes and dimensional changes in wood, and shows how those who manufacture wood products can minimize shrinkage-related problems in their products.
 To understand how wood shrinks, we need to understand its structure. At the microscopic level, wood has the appearance of bundles of soda straws, in which the fibers (usually referred to as wood cells) are long, hollow, and oriented along the direction of the trunk. In the living tree, these hollow cells are filled with liquid water. The walls of the cells also contain water, though that water is bound molecularly to the cellulose molecules that make up the cell wall material. Whenever liquid water is present in the hollow cells, the cell walls are also saturated with water.
After a tree dies or is harvested, the liquid water in the hollow portion of the cells is slowly lost to evaporation. The point at which all liquid water has evaporated, but the fiber walls are still fully-swollen and saturated with water, is called the fiber saturation point. This is an important condition, because even though a significant amount of moisture has been lost, no shrinkage has taken place, since the cell walls are still fully swollen. In most wood species, the fiber saturation point is around 28-30% moisture content.
As wood continues to dry below the fiber saturation point, it begins to shrink, since moisture is being lost from the cell walls. The amount of moisture that leaves the cell walls depends on the relative humidity of the surroundings, since wood moisture content eventually reaches an equilibrium point with the relative humidity. The drier the air, the greater the moisture loss, and, consequently, the greater the shrinkage. Wood used indoors, such as in furniture, cabinets, and wood floors, eventually reaches an equilibrium moisture content around 8%. So, manufacturers of these products should make sure that the wood they use has already been dried to that level. If they do not, the products will shrink and could cause problems after they are placed in service.
The surface of a piece of wood reaches equilibrium with its surroundings fairly quickly. The inner part of the wood takes a bit longer, since it takes a while for the moisture to migrate out of the piece. We refer to this moisture difference within a piece of wood as a moisture gradient. In extreme cases, such as when green, fully swollen wood is placed in a very dry environment, the outer shell dries quickly before the inner portion begins to dry at all, and damage can occur to the wood. In these cases, the outer shell shrinks and squeezes the wet inner wood. If the squeezing, or compression, of the inner wood becomes high enough to exceed the compression strength of the wood itself, the inner cells may collapse. Kind of like a flattened soda straw. Improper kiln drying can cause collapse of the inner wood cells, but good kiln operators are aware of this and use drying schedules that prevent this type of damage from occurring.
Logs used for house logs should be dried prior to being placed in service, and a reasonable target moisture content is 15%. That way, most of the shrinkage has already taken place. Building with “green” logs, which are those harvested from living trees, will result in considerable shrinkage in walls of log homes and requires specialized construction techniques to allow for shrinking around doors, windows, interior walls, and stairs. The actual final moisture level of logs in log home walls will vary by climate zone, but a typical range is between 10 to 14% moisture content. One industry standard considers logs to be “dry” as long as the moisture content is no greater than 19% at a depth of 1 1/2 inches, but it is clear that additional drying, and therefore, shrinking of walls, should be expected in the completed home. So, pre-drying to the 15% target moisture content has some real benefits.
 The amount of shrinkage that takes place in wood depends on several factors, including: the amount of moisture loss; tree species, and grain orientation. We have already seen that pre-drying can limit the amount of moisture loss (and, therefore, shrinkage) that occurs after a home or piece of furniture is built. Some tree species shrink (and swell) more than others. However, as long as pre-shrinking has taken place, the individual differences become less of a consideration, unless the wood continues to dry once it is converted to the final product.
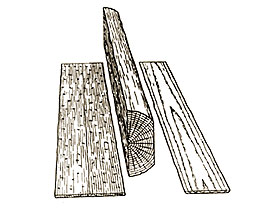
An interesting phenomenon with wood, however, is that shrinkage varies according to the grain (or, fiber) orientation. Along the grain, wood typically shrinks very little, so length change in logs or lumber is quite small. Most shrinkage occurs across the width of logs or lumber, and even then, there are differences. Think back to some geometry terms. A line drawn from the center of a circle to the outside is called a radius.
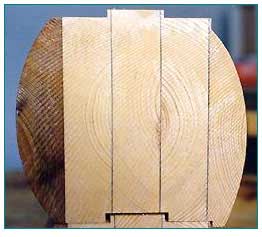 A line drawn such that it only touches the edge of a circle is called a tangent. Boards cut from logs such that the exposed face is oriented in a tangential direction will shrink twice as much as boards cut in a radial direction. In lumber this shrinkage difference can cause distortion in the form of warping or cupping. In logs, the shrinkage difference results in checking.
Pre-drying round logs can take a considerable amount of time, since they contain lots of water and their volume is large. Log home producers specializing in round logs typically must wait over a year for their logs to dry to 15% or less moisture content. Nonetheless, this drying period is essential for pre-shrinking the logs and minimizing (or eliminating) further shrinkage after the walls are built. Even “standing dead” trees can contain lots of water so drying for a period of time may still necessary. It is also important to note that even though the outside shell of a log may be dry, the interior may remain at a high moisture content, and additional shrinkage will occur.
One advantage in laminating kiln-dried lumber to produce house logs is that each board has already been dried to the appropriate moisture content. That way, the laminated product has a uniform moisture content that is quite close to the final equilibrium moisture content it will achieve in the log home. Another advantage is that checking is essentially eliminated, since checking is nearly eliminated by converting logs to lumber. The result is a stable, check-free log.
“Settling” of log home walls often occurs after construction. The amount of settling varies considerably from one home to another. The major causes of settling include: settling of the foundation into the soil; settling of the layers of logs, and additional shrinkage taking place. It is important that concrete foundations be poured onto undisturbed soil, or subsequent compaction will take place. If foundation settling occurs unevenly, cracks in the concrete can form and the home may tilt slightly. Good builders usually can prevent this type of settling from occurring. Log layers may compact on each other slightly, taking up the slack between logs as the weight of the building (and snow) presses down. Compression of the logs does not occur, since the strength of wood in compression far exceeds the loads involved. Additional shrinkage, on the other hand, is usually where the most “settling” takes place. A home built with “green” logs can have as much as 2 inches of shrinkage or more in an 8-foot wall! Log home builders who specialize in green log construction will allow for this shrinkage around doors and windows, so as to prevent damage. However, they must also take care in the placement of interior walls and stairs, so that the log walls can shrink around them. Building walls with logs that are pre-dried to an equilibrium moisture content of 10 to 14% will minimize the amount of shrinkage-related “settling” in walls.
Checking
As logs shrink, they develop surface cracks called checking. Logs usually develop a single dominant crack, the location of which can be controlled by kerfing the log (making a saw cut down the length of the log).
There will be secondary checking which, when it is located on the upper surface of the logs, will catch and hold moisture. To avoid establishing pockets of wood decay and damage from the freeze/thaw cycle in these upper surface checks, they should be filled with an appropriate material.